Unleash Your Creativity: A Kid-Friendly Guide to Creating a Dragon in Roblox
In the ever-expanding world of digital creativity, Roblox has emerged as a powerful platform for young minds to explore game development and 3D modeling. Today, we’re embarking on an exciting journey to create a dragon in Roblox, combining the magic of voxel modeling with the basics of Lua programming. This tutorial is designed for beginners, particularly children, who are taking their first steps into the realm of game design.
Getting Started: Tools of the Trade
Before we dive into creating our dragon, let’s gather our digital tools:
- MagicaVoxel: This free 3D modeling software is perfect for creating voxel-based models. It’s user-friendly and ideal for beginners.
- Roblox Studio: The official tool for creating Roblox games and experiences.
Step 1: Crafting Your Dragon in MagicaVoxel
MagicaVoxel will be our digital sculpting studio. Here’s how to bring your dragon to life:
- Launch MagicaVoxel: Upon opening, you’ll see a grid representing your workspace.
- Familiarize yourself with the tools:
- Attach: For adding voxels
- Erase: For removing voxels
- Paint: For coloring your creation
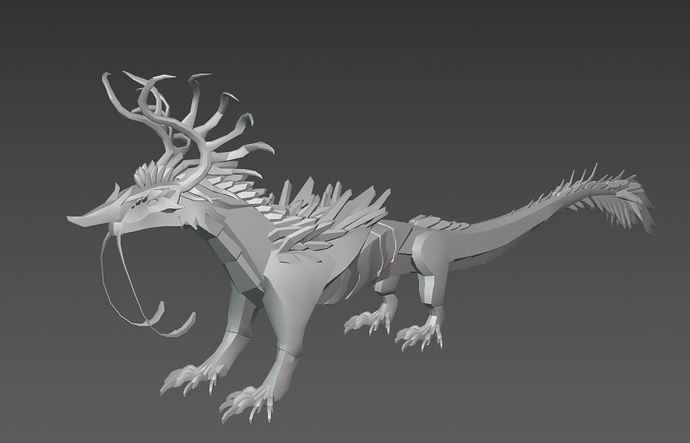
- Create the dragon’s body parts: We’ll make three main sections – head, body, and tail.
- Use colors wisely: Green for the body, white for eyes and teeth, red for the tongue.
- Save each part: Export each section as a separate .obj file.
Pro Tip: Experiment with different brush shapes like spheres, cubes, and lines to add detail to your dragon.
Step 2: Bringing Your Dragon into Roblox Studio
Now that we have our dragon parts, let’s assemble them in Roblox Studio:
- Open Roblox Studio and create a new project.
- Click on “Import 3D” and select your exported .obj files.
- Resize and position the parts to form your dragon.
- Rename the segments sequentially (e.g., D1 for the head, D2 for the neck, etc.).
Step 3: Animating Your Dragon with Lua
Here’s where the magic of coding comes in. We’ll use Lua to bring our dragon to life:
- In Roblox Studio, create a new Script in the Workspace.
- Copy and paste the following code:
local speed = 5  -- Adjust for faster or slower movement
local TweenService = game:GetService("TweenService")
local parts = workspace:GetChildren()  -- Get all parts in the workspace

local function moveDragon()
    while true do
        for i = #parts, 1, -1 do
            local part = parts[i]
            if i == 1 then
                -- Move the head randomly
                local direction = Vector3.new(math.random(-1, 1), math.random(-1, 1), math.random(-1, 1)).Unit
                local newPosition = part.Position + direction * speed

                local tween = TweenService:Create(part, TweenInfo.new(1), {Position = newPosition})
                tween:Play()
            else
                -- Move body parts to follow the part in front
                local targetPosition = parts[i-1].Position
                local tween = TweenService:Create(part, TweenInfo.new(1), {Position = targetPosition})
                tween:Play()
            end
        end
        wait(1)  -- Wait before the next movement
    end
end

moveDragon()  -- Start the dragon's movement
This script does the following:
- Defines the dragon’s movement speed
- Uses TweenService for smooth animations
- Moves the head randomly
- Makes body parts follow the segment in front of them
Understanding the Code
Let’s break down some key elements of our Lua script:
- Variables:
speedcontrols how fast the dragon moves.TweenServicehelps create smooth animations.partsstores all the dragon segments.
- The
moveDragon()Function:
- Uses a
while true doloop to keep the dragon moving continuously. - The
forloop iterates through the dragon parts in reverse order.
- Head Movement:
- Generates a random direction for the head to move.
- Calculates a new position based on the current position and direction.
- Body Movement:
- Each body part moves to the position of the part in front of it.
- Animation:
TweenService:Create()generates smooth transitions between positions.tween:Play()starts each movement animation.
- Timing:
wait(1)creates a 1-second pause between movements, making the animation more natural.
Bringing It All Together
Once you’ve input the code and run the script, your dragon should come to life! It will move its head randomly, with the body following in a snake-like motion. Feel free to adjust the speed variable to make your dragon move faster or slower.
Conclusion and Next Steps
Congratulations! You’ve just created an animated 3D dragon in Roblox. This project combines 3D modeling, game design, and basic programming – all valuable skills in the world of game development.
To further your skills, consider exploring:
- More complex Lua scripting for advanced behaviors
- Adding user interactivity to your dragon
- Creating environments and obstacles for your dragon to navigate
Remember, game development is all about experimentation and creativity. Don’t be afraid to modify the code, change colors, or add new features to make the dragon truly your own!
Whether you’re dreaming of becoming a game developer, a 3D artist, or just love creating in Roblox, projects like this are a great way to learn and have fun at the same time. Keep exploring, keep creating, and who knows? Your next project might be the next big hit on Roblox!


Post Comment